Easy Gift Bag Art

Someone once gave me a lovely gift. Unfortunately, I have no memory of what it was or who it was from (blush of shame) but what they didn’t realize was how much I’d love the packaging it came in!

GiftBagIMG_8555ee

I saved it over the years to reuse and eventually used it to package a special gift for someone. A few months later,  this same exact gift bag was coincidentally re-gifted to me. Obviously, the universe destined for me and this gift bag to be together! But my love story with this gift bag hit a bit of a bump in the road when I noticed it had a bad tear in the side. So I had to figure out a way to preserve the beauty of this bag in a way that would keep the love alive.

So with a few basic craft supplies, here’s what happened –

GiftBagArt1

Not bad, right?? I wasn’t able to cut out a sheet of the gift bag that was big enough to cover the whole canvas, but I rather like it this way too!

If there is a special gift bag in your life that you want to preserve as wall art, here’s what you’ll need –

GiftBagArtSupplies

– A gift bag you love

-A canvas

-Ruler

-Rotary Cutter

-Paint of your choice

-Paint Brush

-Water for wetting your paint brush

-Mod Podge

-Sponge Brush

Here’s what you do:

1. Paint the canvas in solid color of your choice. Allow it to dry. (I like to start with a diluted layer of the paint and then add more coats of paint after each previous layer dries.)

2. Cut out and separate the largest side of the gift bag so that you have a nice flat sheet of the gift bag paper/plastic to work with.

3. Using your ruler and rotary cutter, cut the sheet to fit your canvas.

4. Sponge on a layer of Mod Podge onto the back side of your gift bag sheet. Place it onto your canvas.

5. Finish up by applying a final layer of Mod Podge to the overall surface of your brand new art piece! DONE!

This project can be modified for use with just about any type of gift bag! So don’t get upset if you feel like you have to say goodbye to those pretty little hearts on the gift bag you get for Valentines Day today! Just cut them out and mod podge them onto a canvas and you never have to say goodbye!

GiftBagArt2

SIDE NOTE: Speaking of gifts, that reminds me…the storage unit under the gift bag art was my Christmas gift from the hubby! It’s from Target and I.LOVE.IT. I had it assembled by some serious professionals –GiftBagIMG_8531

So there you have it. Art doesn’t need to be extra fancy or difficult to be beautiful! You just have to keep your mind open and you never know when or where inspiration will hit!

GiftBagArt3

Happy Valentines Day!

On A Ledge.

Ledges.

Ledges can be intimidating…especially if it’s by the edge of a great expanse of dark raging waters or located way up high where even the birds would get a little dizzy and nervous.

But there are other types of ledges that can be intimidating. Take for instance, the ledges that I have faced in my house, over the fireplace, or in this case, in my craft room, looking bare and waiting for that special decor to bring it some personality, color and style.

It can be a daunting task to come up with classy and decent-looking decor when you have a totally blank slate coupled with a tight budget. Where to begin? What to avoid? What colors to pick?!

IMG_4336e

Ledge in my craft room soon after we moved in – Cluttered and plain

The ledge in my craft room, which runs along the entire length of a wall, was utterly bare and in need of some life. I wandered through many a store looking for inspiration and finally got it when I came across a deal on picture frames!

IMG_6215A

FRAMES + SCRAPBOOK PAPER = LEDGE SOLUTION!

I picked out my favorite pieces of scrapbook paper and made the word “CREATE”; a word of encouragement for me to keep at my crafting since it’s what I love to do. I printed out some WordArt letters from MS Office to use as stencils and traced them backwards onto the back of my scrapbook sheets.

CREATE8

Letters are traced backwards onto the back of the scrapbook sheets. This ensures the front of the letter doesn’t have any stray pencil marks smudging the pattern.

I used regular tacky glue to stick my scrapbook letters onto scrapbook paper rectangles I had cut out to fit the frames.

Here’s the result –

CREATEcoll

And on the ledge –

CREATE1aPaired with a bright wall color, it adds a pop of vibrancy and happiness to the room. I bet this would also work well as a wall hanging with a child’s name in a nursery or even in a main room, with the word “LOVE” or “FAMILY” in black/white.

OH! But that’s not all! No…there’s still a whole slap of bare wall above the ledge, isn’t there. Rather than put you through the suspense and misery of waiting till my next post to see what I did, I’ll just tell you about it now! (Or maybe I’m telling you now because selfishly, I just can’t wait. Ok, let’s just say I’m sharing this now because I am a kind and wonderful humanitarian. Yeah, that sound’s good.)

I decided that I needed to be better about keeping track of time whilst crafting so my focus for the empty wall became clocks. I accidentally stumbled upon this GORGEOUS Chrysanthemum Clock on the That’s What {Che} Said blog, which was made with plastic spoons. (Seriously. Plastic Spoons.)  After seeing how gorgeous her DIY clock was, no other clock would do.

With a cheap-o clock from Wal-Mart, some spray paint, foam board and spoons, I created this lovely wall clock, and thus completed my ledge/wall decor challenge –

WallClockpl

My work table faces this wall and I love it! This is one ledge that I’m not intimidated by, anymore!

Playing Catch Up

Yikes! Where did the time go??

I’ve been a busy girl! Let’s catch up, shall we?

In August, we made a trip to Chicago for a wedding. This crafty mama decided that the little man was over-due for a pair of snazzy suspenders and so that’s what I worked on!

I had a LOT of help from a tutorial I found from the blog, Make It & Love It. I picked out an adorable pin-dot fabric and found all the necessary clips at my local Joanne Fabric Store.

SUSPENDER Project

Paired with a bow-tie, the results were absolutely timeless and adorable.

IMG_6945

While in Chicago, we also did a little sight-seeing. Here is a quick glance at our trip:

BeFunky_IMG_3857.jpg

[Left to Right – Top Row: View of Lake Michigan and Chicago skyline from Navy Pier, Deep Dish Pizza from Lou Malnati’s, Chicago’s famous “Bean” aka “The Cloud Gate”. Bottom Row – Entrance to Navy Pier, Family Photo from Wedding, Live Jazz Festival at The Jay Pitzker Pavilion at Millennium Park]

Then in September, I continued working on my craft room (which is still a work-in-progress), learned how to use Mod-Podge, and got good practice with pant alterations. FIY-When you have pants that can do double-duty as socks when you wear them, it’s time to hem.

Here’s the Mod-Podge project I had worked on:

Ribbon Storage

As handsome as the Quaker Man is, I used scraps of scrapbook paper and covered over a few empty oatmeal containers I had. They are the perfect size for storing all of my ribbons and add a nice bit of color to my craft room. (If you add a vertical slit in the canister, you can turn the storage into a ribbon dispenser.)

And now it’s a beautiful crisp autumn over here and I’m practically rolling around in pumpkins! We’ve been roaming pumpkin patches, painting and carving pumpkins, having Pumpkin Spice Oatmeal for breakfast, sipping on Pumpkin Spice Tea and Lattes, and even having Pumpkin Spice Cream Cheese for my Bagels! Pumpkin overkill? Not for THIS pumpkin junkie! Bring on the Thanksgiving Pumpkin Pie…and perhaps a treadmill. Yes, I think a treadmill will be necessary.

I also love Autumn for all of the colors that it brings out in nature. So,  I brought some of those colors indoors!

Autumn Mantle - Pumpkins

Autumn Mantle - Decor

Left: Family Photo from J’s 1st Pumpkin Patch Visit at 6 mo. old
Right: Squirrel was J’s special request for our Fall decor

Oh Autumn! – a time for cozy sweaters & hoodies, hearty stews, boots, pumpkin pies, knitting, bright foliage, hot chocolate, curling up with good books and enjoying the holidays with family and friends. I do love Autumn.

Phew! This post was long so kudos to you for making it all the way to the end! And now we’re (finally) all caught up!

Stay warm and have a beautifully blessed autumn, my friends!

Happy Autumn

Summer Wreath

Now that I find myself inexplicably drawn to the warmth and sunshine of the summer season , I decided it was time to see what I could craft while enjoying the outdoors. I do have a good bit of sewing projects to do and I do have an outdoor outlet. However, something tells me that my neighbors wouldn’t be too thrilled with me sitting on my porch with Bessy, stomping away at her presser foot, while she belts out her sewing machine “song” (zzzzzZZZ…CH-CH-CH-CH-CH-CH-CH). Bessy’s no old lady but she’s still not exactly a sewing machine built for stealth.

So the next thing on my To-Do list, aside from sewing, was to make a summer wreath using items I had around the house. Being the crafty lady that I am, I actually happened to have a metal wreath-form laying about. I wrapped that with some twine.

Wreath1

Word to the wise: Don’t wrap too tightly or the metal form will bend and you will have to undo your work. (Confession: I wrapped that thing tighter than Spanx on a burly man my first go-around.) Wrap the twine firmly and closely, but not too taut.

Wreath2

Once I had the wreath form wrapped in twine, it was time to “pretty” it up. Luckily I had spare faux flowers in the house!

I had originally bought bunches of these flowers from the dollar store for functional party decor. I had cut each flower from their bunches and attached them to Sharpie markers with floral tape to create a writing “arrangement” for a birthday card signing-station.

Wreath3

That was 3 years ago so the markers are dry and the flowers, ready to use for Project: Summer Wreath!

Wreath4

(For all of the Super Sleuths out there, that IS painters tape along the bottom of the window sill. We’re finally getting geared up to paint my craft room! I’m excited.)

I poked the stems of the flowers through the twine in a design that I liked. Then I used hot glue to keep them in place. I used a wire cutter to trim the excess stem that protruded from the back of the wreath.

Overall, this wreath is pretty easy and fast to make! I hot glued a wooden letter S to the bottom to add a monogram-personalized touch.

Wreath5

I love the colors of this wreath and I think they’d compliment the new wall color going up in my craft room. (Can you guess what color I’m painting the room??)  So I may end up hanging this on the door to that room!

Wreath6

Happy summer days, everyone!

River Rocks Redone

When I first got my own place, 8 years ago, I thought my decorating skills were top-notch. I had never ever even glanced at a home-design magazine or TV show. Nor did I have any idea about patterns or color combos. I was just a “natural”….eh, natural disaster. Instead of having any idea of what type of style or atmosphere I wanted to create, I went crazy buying all sorts of decorative things that didn’t really go with anything. I was convinced I was doing a great job though. Ah, the pains of ignorance…not as blissful as it once was.

Now that we’re in our new place, I have to deal with all of my old “baggage” of decorative junk and find ways to make them work. One of the items in my baggage are river rocks. Lots of them. I went through a river rock phase and put them in literally every vase I owned.

RiverRockVase
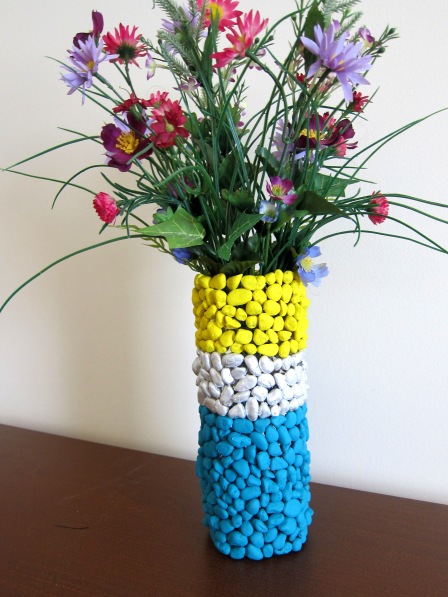
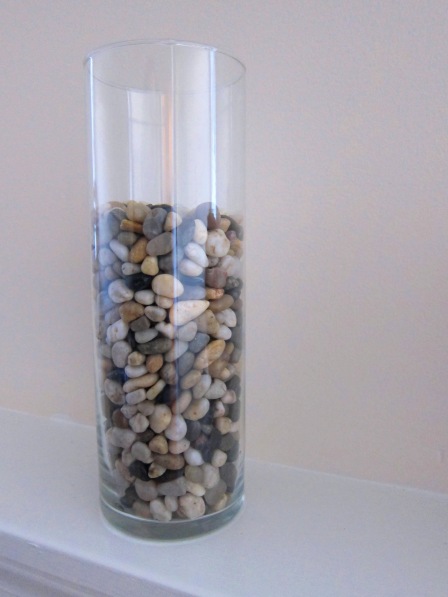
I am no longer a huge fan of having jars of rocks everywhere so I decided to get crafty with it.

I dumped out the river rocks and threw a handful into a Dixie paper bowl. I drizzled some acrylic paint over it and stirred it up with a paint brush.

Painted Rocks

This step only took about a minute to complete. I repeated this with a yellow and metallic pearl for a few more batches of rocks.

After the rocks were evenly coated, I spread them out on the plastic wrapping of an unopened pack of poster boards to dry. I’m sure wax paper would suffice. It didn’t take long to dry.

VaseRemodel

I hot-glued all of the rocks onto my vase. This was a slightly tedious process since the rocks are small, but I’m happy I did it! FYI, I did not bother with trying to make the rocks perfectly flush with each other.

After all the rocks were glued on, I used a paintbrush to apply a dab of a 2nd coat of paint to the top surface of all of the rocks.

I now have a beautiful custom-designed vase which will add a fun splash of my favorite colors to my craft room.

Colorblock Vase
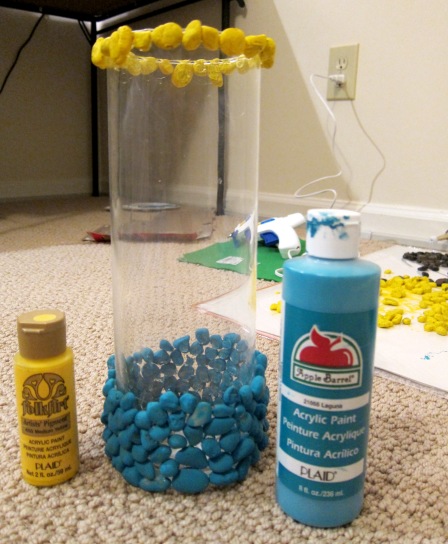
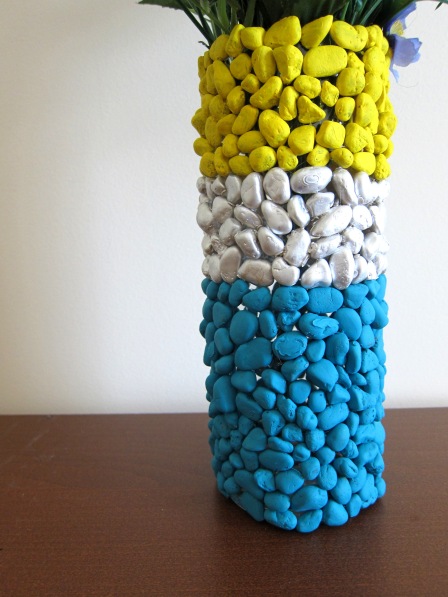
(The craft room is under construction right now, so this vase is in its temporary home, in our guest bedroom.)

This project is a great and inexpensive way to add unique colors and color combos to coordinate with your room/decor!

VasewithFlowers

The flowers you see in here are temporary. I’m actually not sure what type of flowers to put in here. Maybe some playful white daisies? I don’t know. What do you think??

Recap – The Sweet Start of My Crafting

Although some of it comes naturally, I’ve been teaching myself many of the arts associated with crafting for a while now. Sewing and yarn-crafts, were skills I once thought out of my league. But when I learned that I was going to become a mama, I decided to take on a whole slew of new learning. Thanks to Google, YouTube and Freckled Nest I discovered that I was capable of quite a bit. My craftiness, which used to focus on the illustrative arts, expanded as I, in preparation for the baby, learned to sew bibs, knit hats and more.

Although this is just the start of this blog where I plan on sharing all of my latest and greatest, I’ve decided to re-visit some of my past creations with you.

Here’s a quick recap of a few of my favorites:

CraftRecap

I now have my own CRAFT ROOM! I’m beyond excited! To be honest, it’s pretty bare right now, but I’ve got some big plans for that space. I’ll be sure to post the before/after shots so you can see the transformation as I create my little happy place.

Also, I’ve crafted a few things this year that I can’t wait to share with you, so stay tuned for some great Sheepsakes! 🙂